Tuesday, March 1, 2016

Make a ring light from a plastic cake lid

I was saying to myself the other day, "you know I'm gonna get down on it and make a ring light sometime here..." or something like that. Well despite how I thought it to myself, I did get around to making a ring light. Its almost finished, just need some transparent white stuff to cover the ring.


Components.
- A type of plastic lid. I used a cake dish lid from some grocery store bakery cake.
-Exacto knife
-something tubular or cylindrical to block the flash from the lens
-white spray paint (flat)
-Reflective duct tape
-some white transparent material to soften the flash
-duct tape
-White trash bag or something of similar properties that will diffuse the light
To build:
Firstly I spray painted the inside of the lid white.

I used a almost finished roll of gray duct tape to trace out the center circle that the lens will protrude into. I just marked the center of the dish, then eyeballed (guessed) where it was centered. I used the almost finished duct tape roll for tracing the outline.

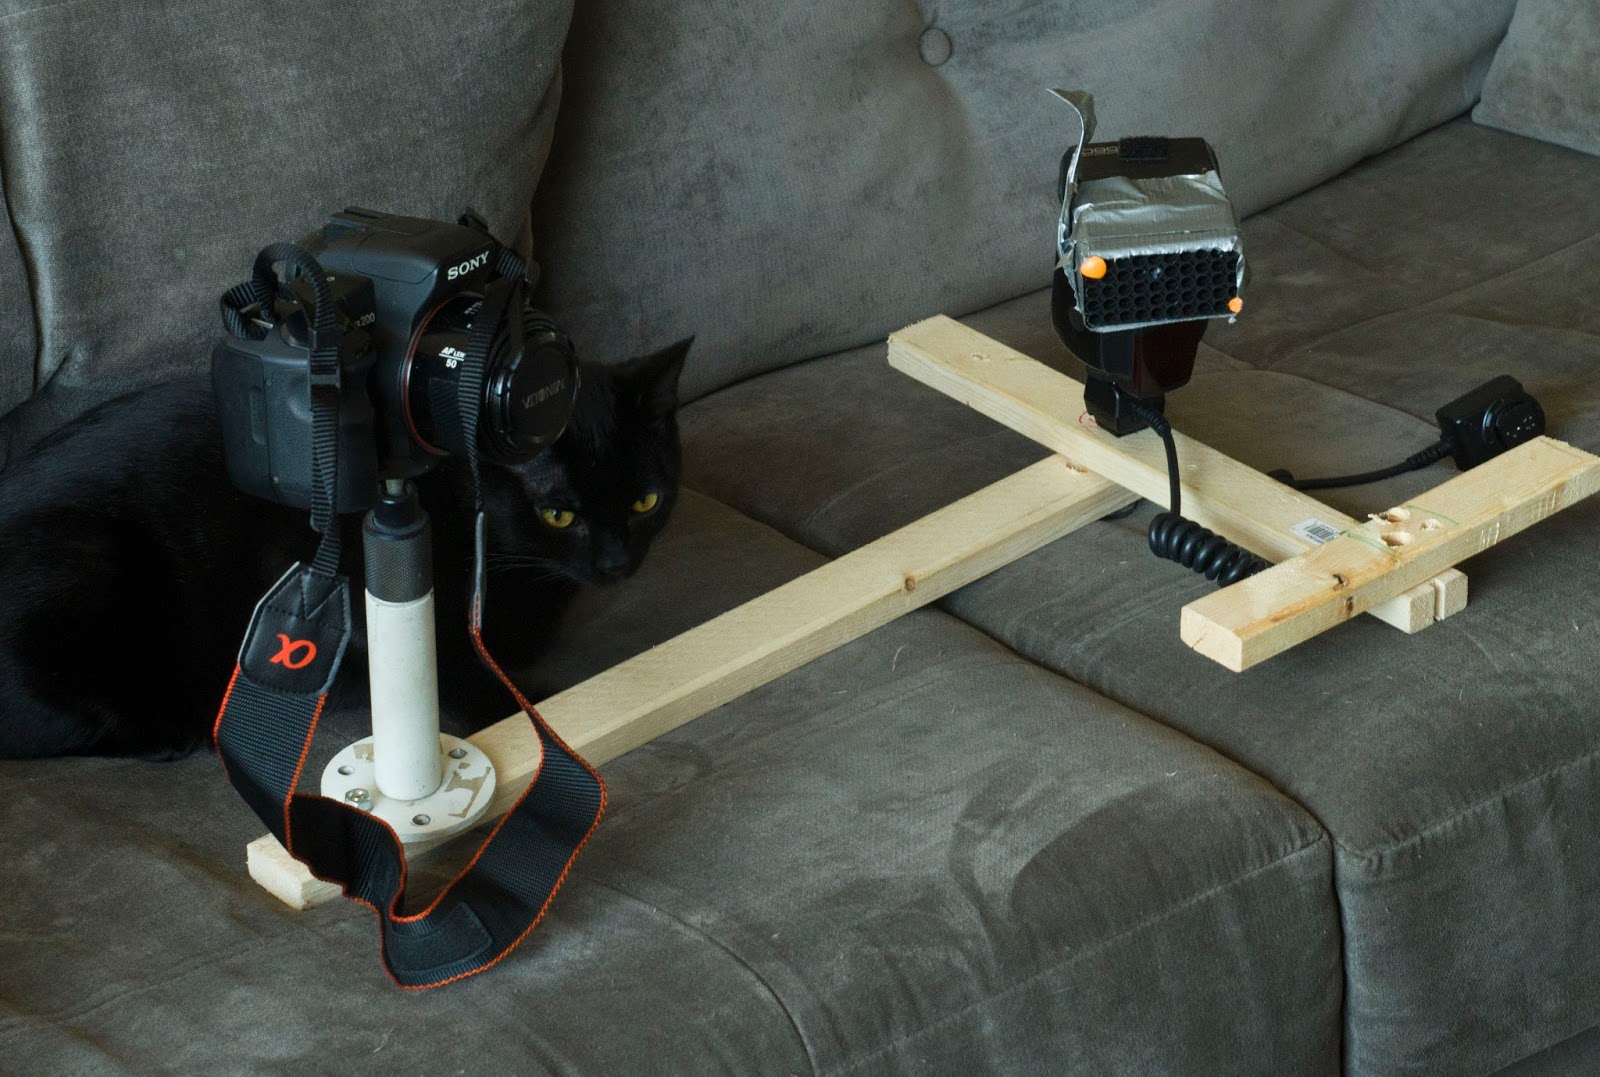
Originally I cut the flash hole in the back of the dish, but I changed that location to the lip of the lid so that there is more light dispersion. I taped the bottom and half of the lip with reflective duct tape.
For the center hole, I just grabbed two disposable cups and cut them (to make two pieces)so that they were cylindrical like then taped them into the lens whole.

At this point its nearly finished, you could modify it here for your liking.

All the photos in this post were shot with the lens through the center of the ring flash, except for the one that' devoid of color and the flash is off to the side.

EDIT: So I topped all this off by covering the ring light recessed area with a white trash bag, and finally I taped off some of the inside diameter of the ring, effectively narrowing the area that the light will come through. At this point I think the project is finished. There are other DIY ring light projects out there, so if this doesn't seem your bag, fret not.
Ring Light finished, non human example. Unedited pic.

Ring Light finished

Ring light finished, taped off diameter

Luna Ring light

Myself ring light almost finished

Ragnar Ring light almost finished

Ring Light close to completion

Pentax-M SMC 28mm F-2.8 Lens

So I was out taking some photos of the Tower Bridge one night, and my 50mm wasn't cutting it. I could only get like 3/4s of the bridge in the shot. So I decided it was time I got a dedicated 28mm lens. In my hasty resolve to acquire this new lens I bought the Pentax-M 28mm f-2.8. After using it for around a week, actually at like 3 days, I had decided that the sharpness of the lens would not work for me.So I put it on the shelf for a while.
     I've been using it on my Pentax *ist DL and just using it for close up work and surprisingly it does fine for that sort of thing, the building shots that I took with it about a month ago, were totally unimpressive and that is when I kinda just decided that it wasn't what I wanted. I also noticed a lot of chromatic Abberation, so minus a few more points there.

I began using the lens with a Light Ring that is still a work in progress and it does fairly well for that sort of thing. The subjects aren't that far away and it doesn't degrade the detail. I took some cat pictures this morning with the *ist DL, and they came out pretty decent, acceptable at least.

My opinion of this lens is that it SUCKS for building or landscape shots, especially concerning anything with a large amount of detail. Close up is this lens main fulfillment in life.

These are some building shots I took with the 28mm, they are pretty decent but the detail is shitty. the close ups of myself and the cats are like I said more than acceptalbe. Comparatively to say the SMC 50 DA f1.8 or even the *ist DL kit lens.
Me looking super great, with DIY (work in progress) Ring Light

Ragnar, as always looking displeased about the camera.

Rambo, enjoying some plants.

Remington, ever alert.
Hotel Downtown.


Monday, February 29, 2016

Neewer products.

If you surf Amazon looking for some more gear to add to your repertoire you've more likely than not, seen stuff made by Neewer. They make all sorts of cheaper photography gear. Well, should you consider buying some of their stuff, don't use amazon, head to their official site, and buy their stuff there, because they don't charge you for shipping. Thats it.

Saturday, February 27, 2016

Light Bar, Light Saber, Light strip, DIY, Lighting

So I made this lighting diffuser, based off of The Angry Photographer's Light Strip lighting thing. My version is a little different, I'll get around to that in a day or two, heres some photos to show case this thing.

Build. I used a longer type cardboard box, cut one side out (that leaves 3 left) and also cut one of the bottoms out. I sprayed white paint inside the box thoroughly and and then let it dry. Afterwards when the paint is DRY, I layed down a layer of duct tape that is reflective. You can find at probably any hardware store in the area they keep ducting stuff.  As per Angry's box he made a modular piece that easily removes from the main reflective piece. That removable piece is for the speedlite unit. It should be easy to open and use. I didn't use a cover for the open part of the reflector piece, as Angry did, he used laminated tracing paper, neither item I posses, nor do I feel like going out to laminate some tracing paper. I also didn't not apply the reflective tape on the inside all over, just the bottom.


Sunday, February 21, 2016

Soft box Close ups with 28mm.

So the soft box can kinda emulate the ABR800 portrait effects. I mean kinda, when I say "kinda", Its similar but not the same. Still it looks alright. These are two of me that I adjusted according to what you were trying to achieve. You don't need a several hundred dollar product, when you can "kinda" emulate its effect with a card board box...


Monday, February 1, 2016

DIY flash bracket/jig, with DIY grid.


Apparently I like to cobble together shit to see what happens if I do this, or do that. What if put this here etc. So I made a super simple flash bracket/jig. The components that I used were just some 1x2" wood and some bolts to attach them together plus a bolt that allows the flash to be mounted onto the wood, and an old security camera mount with an adjustable head. You could probably find something similar that allows tilt of the camera to match interception of the flash.

This thing is useful for probably not that many things, the one thing I find it super useful for is not having to hold the flash in one hand and the camera in the other. I just get the angle of interception down then adjust the focus and I only need to worry about manipulating the shutter. Its very convenient for subjects like Cats.
Edit: I also took some photos with my Soft box, attached to this bracket. I'll put them down below.

The pictures I provided for an example were taken with a flash mod that I have made a post about on this blog.

As for instructions, well cut the wood to the length you think will work, and screw it together. I just eyeballed this thing so there really isn't any technical directions. I used a large retained nut that was off an old tripod or something. Its underneath where the flash arm and the camera base connect, I would recommend using something like that or maybe a washer and a wing nut so you can adjust the flash arm accordingly.

List of parts/Directions

Some 1x2" wood, or something that works in the same manner.
1 or more bolts with the same thread type as the cameras tripod mount (this is universal so far as I know) I'd get a couple just in case.
I counter drilled the hole for the mount bolt, because the screw wasn't long enough to protrude enough threads through the wood for a good lock. They're are probably longer ones, but these were free.
A bolt long enough to go through both 1x2" pieces of wood, plus receive a washer and a wing nut or some type of locking nut.
A type of mount that your camera can fasten too. Either the camera or the flash could move or both, but with the thing I built the flash is fixed, and the camera can tilt. So thats up to you to figure out.
The rest is up to you. I'm sure a lot of people could come up with something much better than this. Shit brackets are like 15 dollars on amazon, but this was FREE!.


Sunday, January 3, 2016

22. Long Rifle Cartridge holder flash mod or just 22 mod. Grid Type Mod

So I came up with a really simplistic mod for speedlites. It requires 5 or 6 or more 22. Long Rifle  cartridge holders. Its basically like a type of grid attachment. All that you have to do is stack them together and tape them to the speedlite. I used some empty 22. Long Rifle brass and some old ear plugs to hold the cartridge holders together. Then I used some duct tape to affix the mod to the flash. The convenient thing is that you can add more cartridge holders if you want without much hassle other than putting them on, and taping if you choose.
Below is just one of the holders attached to a flash. I now have about 5 or 6 stacked for a better effect.

The cats (except for the gray cat below), myself, the flowers were shot with one or two holders and another type of holder with wings. The camera and the book were shot with the holders stacked 5 or 6 deep.
6 stacked together.
With one 22 LR holder.


6 Stacked together.


6 Stacked together.

6 Stacked together.

With one 22 LR holder.

With one 22 LR holder.

With one 22 LR holder.